Tuesday, July 22, 2008


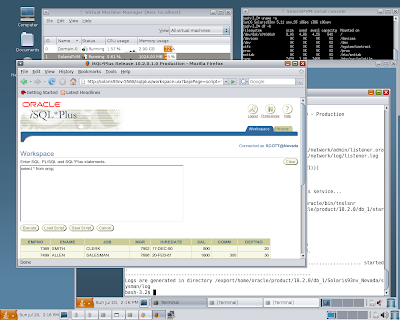
Install Oracle 10.2.0.1 (64-bit) on SNV93 DomU at SNV93 Dom0


This instruction closely follows the one for 32-bit install
Oracle 10.2.0.2 on Solaris 10 at oracle-base.com ([1]). I have to
notice that attempt to reproduce it on 32-bit SNV93 DomU crashes
as usual. View discuss forum@opensolaris.org ([2]).
However, it's a bit different from [1] and allows to perform everything
quite smoothly. It is also supposed to be used only in development environment.


As the root user, issue the following command.

# projadd oracle

Append the following line to the "/etc/user_attr" file.

oracle::::project=oracle

If you've performed a default installation, it is likely that the only kernel parameter you need to alter is "max-shm-memory".
To check the current value issue the following command.


# prctl -n project.max-shm-memory -i project oracle
project: 100: oracle
NAME PRIVILEGE VALUE FLAG ACTION RECIPIENT
project.max-shm-memory
privileged 254MB - deny -
system 16.0EB max deny -


To reset this value, make sure at least one session is logged in as the oracle user, then from the root user issue the following commands.


# prctl -n project.max-shm-memory -v 4gb -r -i project oracle
# projmod -s -K "project.max-shm-memory=(priv,4gb,deny)" oracle


The first dynamically resets the value, while the second makes changes to the "/etc/project" file so the value is persistent between reboots.


# cat /etc/project
system:0::::
user.root:1::::
noproject:2::::
default:3::::
group.staff:10::::
oracle:100::::project.max-shm-memory=(priv,4294967296,deny)


# prctl -n project.max-shm-memory -i project oracle
project: 100: oracle
NAME PRIVILEGE VALUE FLAG ACTION RECIPIENT
project.max-shm-memory
privileged 4.00GB - deny -
system 16.0EB max deny -


Create the new groups and users:


groupadd oinstall
groupadd dba
groupadd oper
useradd -g oinstall -G dba -d -m /export/home/oracle \
-s /bin/bash oracle
chown oracle:oinstall /export/home/oracle
passwd -r files oracle


Create the directories in which the Oracle software will be installed:

# mkdir -p /u01/app/oracle/product/10.2.0/db_1
# chown -R oracle:oinstall /u01


Login as the oracle user and add the following lines at the end of the .bash_profile file:


# Oracle Settings
TMP=/tmp; export TMP
TMPDIR=$TMP; export TMPDIR
# Select the appropriate ORACLE_BASE
#ORACLE_BASE=/export/home/oracle; export ORACLE_BASE
ORACLE_BASE=/u01/app/oracle; export ORACLE_BASE
ORACLE_HOME=$ORACLE_BASE/product/10.2.0/db_1; export ORACLE_HOME
ORACLE_SID=SNV93; export ORACLE_SID
PATH=$ORACLE_HOME/bin:$PATH; export PATH
TERM=vt100; export TERM


Set up Sun Xvnc at DomU and login as oracle via
# vncviewer IP-DomU:1
from another terminal session.


svccfg -s application/x11/x11-server \
add display1
svccfg -s application/x11/x11-server:display1 \
addpg options application
svccfg -s application/x11/x11-server:display1 \
addpropvalue options/server astring: "/usr/X11/bin/Xvnc"
svccfg -s application/x11/x11-server:display1 \
addpropvalue options/server_args astring: '"SecurityTypes=None"'

# Configure dtlogin to start it

mkdir -p /etc/dt/config
cp /usr/dt/config/Xservers /etc/dt/config/Xservers
echo " :1 Local local_uid@none root /usr/X11/bin/Xserver :1" \
>> /etc/dt/config/Xservers
pkill -HUP dtlogin


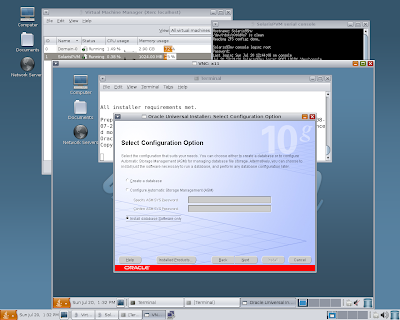
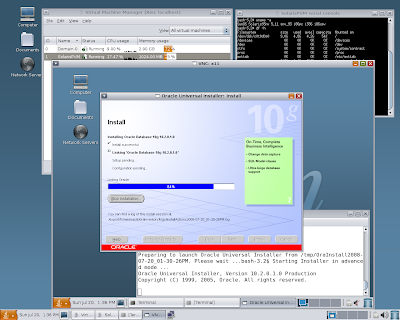
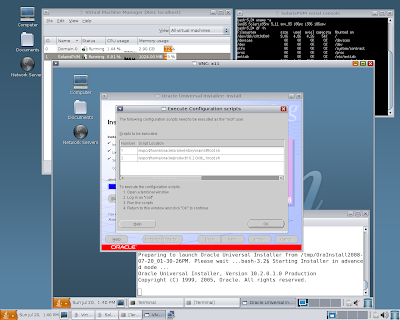
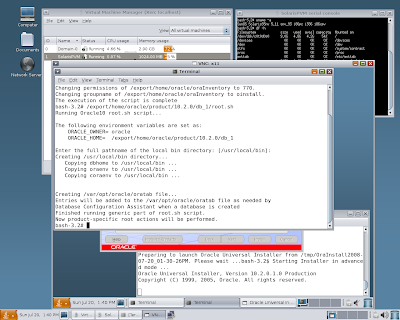
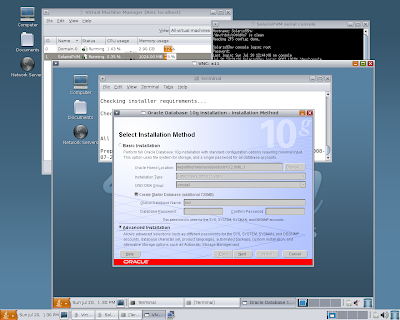
Start ./runIstaller in advanced mode and
select option "Install Software only"


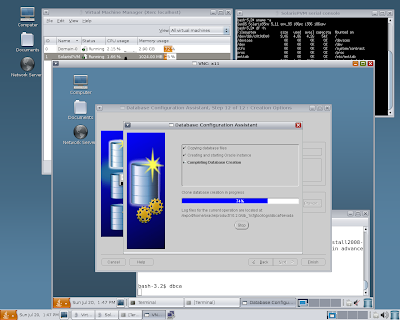
Run "dbca" and create database SNV93 (as referenced by ORACLE_SID)


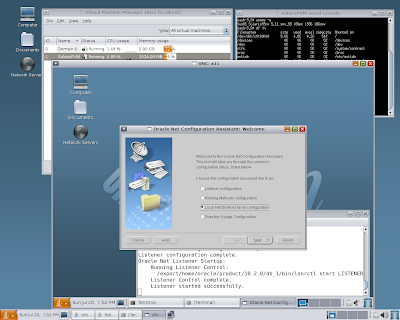
Run "netca" to create LISTENER process and perform Local names resolution creating files listener.ora and tnsnames.ora under $ORACLE_HOME/network/sdmin.


-bash-3.2$ cat listener.ora
# listener.ora Network Configuration File: /u01/app/oracle/product/10.2.0/db_1/network/admin/listener.ora
# Generated by Oracle configuration tools.

SID_LIST_LISTENER =
(SID_LIST =
(SID_DESC =
(SID_NAME = PLSExtProc)
(ORACLE_HOME = /u01/app/oracle/product/10.2.0/db_1)
(PROGRAM = extproc)
)
)

LISTENER =
(DESCRIPTION_LIST =
(DESCRIPTION =
(ADDRESS = (PROTOCOL = TCP)(HOST = Solaris94PV)(PORT = 1521))
(ADDRESS = (PROTOCOL = IPC)(KEY = EXTPROC0))
)
)


-bash-3.2$ cat tnsnames.ora
# tnsnames.ora Network Configuration File: /u01/app/oracle/product/10.2.0/db_1/network/admin/tnsnames.ora
# Generated by Oracle configuration tools.

SNVDATA =
(DESCRIPTION =
(ADDRESS_LIST =
(ADDRESS = (PROTOCOL = TCP)(HOST = Solaris94PV)(PORT = 1521))
)
(CONNECT_DATA =
(SERVICE_NAME = SNVDATA)
)
)

EXTPROC_CONNECTION_DATA =
(DESCRIPTION =
(ADDRESS_LIST =
(ADDRESS = (PROTOCOL = IPC)(KEY = EXTPROC0))
)
(CONNECT_DATA =
(SID = PLSExtProc)
(PRESENTATION = RO)
)
)


Modify file /var/opt/oracle/oratab and change "N" to "Y".
Restart database.


$ emctl stop dbconsole
$ dbshut
$ lsnrctl stop
$ lsnrctl start
$ dbstart
$ isqlplusctl start
$ emctl start dbconsole


Modify /etc/hosts at Dom0 and launch browser at Dom0 to
http://Server93pv:1158/em/
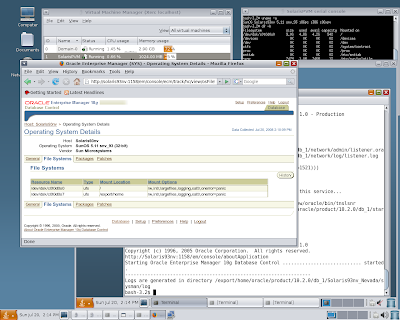


References
1.http://oracle-base.com/articles/10g/OracleDB10gR2InstallationOnSolaris10.php
2.http://opensolaris.org/jive/thread.jspa?messageID=237405

Thursday, July 17, 2008


Install CentOS 5.X DomU at SNV93 Dom0 on boards with integrated NIC RTL8110SC/RTL8111B


ASUS P5K Premium/WIFI, P5K3 Deluxe,P5K Deluxe P5E3 Deluxe,Abit IP35 Pro,Gigabyte GA-P35-DQ6,MSI P35 Platinum have integrated on the board Realtek's NICs RTL8110SC/RTL8111B .RTL8110SC/RTL8111B (vs Marvell 88E8056 first NIC integrated on ASUS boards) are GLDv3 NICs and may be used for Solaris xVM PV and HVM DomUs creation at Solaris (Nevada) Dom0.
However, disabling checksum offloading on Linux DomU netfront driver (eth0) is required to get network on DomU.
Install CentOS 5.X DomU via virt-install as usual:-


# dladm show-dev
LINK STATE SPEED DUPLEX
rtls0 unknown 0Mb unknown
rge0 up 100Mb full

# svccfg -s xvm/xend setprop config/default-nic="rge0"
# svcadm refresh xvm/xend
# svcadm restart xvm/xend

# lofiadm -a /export/home/isos/rhel.iso
# mount -o ro -F hsfs /dev/lofi/1 /mnt
# share -F nfs /mnt
# virt-install -n RHEL5PV -p -r 1024 --nographics \
-f /dev/zvol/dsk/nevada/disk1 -l nfs:192.168.1.35:/mnt


Successfully installed in dhcp mode CentOS 5.X DomU appears to be unable to communicate with other boxes on the LAN and internet, except SNV93 Dom0, due to failure checksum offloading on Realtek 8110SC/RTL8111B.
Attempts of ssh connection from CentOS 5.1 DomU 192.168.1.37 at SNV93 Dom0 (NIC RTL8110SC)
# ssh user1@192.168.1.54
hangs ..
TCPDUMP running on remote box (192.168.1.54)
# tcpdump -s 1600 -vv


One entry generates for each ssh connection attempt.
First:-
17:12:43.058821 IP (tos 0x0, ttl 64, id 19771, offset 0, flags [DF], proto TCP (6), length 72) 192.168.1.37.52189
> 192.168.1.54.ssh: P, cksum 0x83e6 (incorrect (-> 0x9a09), 1169627751:1169627771(20) ack 423312198 win 46
Second:-
17:16:27.515427 IP (tos 0x0, ttl 64, id 19773, offset 0, flags [DF], proto TCP (6), length 72) 192.168.1.37.52189
> 192.168.1.54.ssh: P, cksum 0x83e6 (incorrect (-> 0xbed7), 1169627751:1169627771(20) ack 423312198 win 46


The solution is to disable checksum offloading on eth0 at Linux DomU.
Package ethtools has to be installed at DomU.
Following string has been added to /etc/rc.d/rc.local:-


/usr/local/sbin/ethtool -K eth0 tx off


Setup VNC on DomU:-


# mkdir .vnc
# cd .vnc
# vncserver :1
Vnc password will be requested by the last command.
Edit ~/.vnc/xstartup and uncomment first two lines.
Make this file as follows bellow:
#!/bin/sh
unset SESSION_MANAGER
exec /etc/X11/xinit/xinitrc
[ -x /etc/vnc/xstartup ] && exec /etc/vnc/xstartup
[ -r $HOME/.Xresources ] && xrdb $HOME/.Xresources
xsetroot -solid grey
vncconfig -iconic &
xterm -geometry 80x24+10+10 -ls -title "$VNCDESKTOP Desktop" &
twm &
Make following changes to /etc/sysconfig/vncservers file:-
VNCSERVERS="1:root"
VNCSERVERARGS[1]="-geometry 1024x768"
Then run:-
# chkconfig vncserver on
# reboot


Setup F8 DomU at SNV93 Dom0


1.Login as root to DomU
2.Disable checksum offloading:-
# /usr/local/sbin/ethtool -K eth0 tx off
3.Install vnserver:-
# yum install vnc-server
4.Disable firewall:-
# /etc/init.d/iptables stop
5.Setup VNC as suggested above.
6.Connect to F8 DomU:-
# vncviwer IP-DomU:1
7. Tune firewall to enable port 5901/tcp
and apply settings.


References
1.http://techreport.com/articles.x/12747/1

Monday, July 14, 2008


Virt-manager on Solaris Nevada build 93


Quote:-
The Virtual Machine Manager application (virt-manager) is a desktop user interface for managing virtual machines. It presents a summary view of running domains and their live performance & resource utilization statistics. A detailed view presents graphs showing performance & utilization over time. Ultimately it will allow creation of new domains, and configuration & adjustment of a domain's resource allocation & virtual hardware. Finally an embedded VNC client viewer presents a full graphical console to the guest domain.


Following bellow is step by step procedure of SNV93 PV DomU
install at SNV93 Dom0. Actually, all work supposed to be done was performed in SolatisPV Serial Console, ending up with Sun Xvnc setup to provide graphical interface to SNV93 PV DomU.
ZFS file system has been used as root DomU's image, installation source was set to a local path to SNV93 DVD ISO image.


1. Project is ready to start


2. Proceed with install via SolarisPV Serial Console


3. DomU has been built and restarts


4. Disabling checksum offloading by "xnf" driver at DomU and run
# sys-unconfig
due to known bug with "rge" driver ([1]) , box has been built up on ASUS P5K Premium/WI-FI with integrated NIC RTL8110SC.


5. DHCP request after reboot


6. DHCPACK succeeded


7. Network works fine now


8. Setup Xnvc via scripting tools at serial console


9. At this time you are welcome to new Gnome Desktop environment


References
1.Install SNV91 DomU at SNV91 Dom0 on boards with integrated NIC RTL8110SC

Saturday, July 05, 2008


Install Sun Studio Express 12 on SNV93 DomU at Xen 3.2.1 F8 Dom0


The sample bellow briefly demonstrates attaching SXDE ISO images to SNV_93 DomU as a block oriented device which could be mounted afterwards on /mnt folder at DomU to support Sun Studio 12 Express install on PV DomU via graphical interface provided by Sun Xvnc implementation. Actually,
xm block-attach command allows to avoid uploading ISO image to DomU,
lofiadm this image and etc. Ofcourse, having Solaris NFS share on the
LAN helps out immediately. Procedure makes sense for standalone developers
environment.


Create device /dev/dsk/c0d9s2 at DomU utilizing command:-
# xm block-attach file:/etc/xen/isos/snv90.iso 9 r


Then mount with options "-o ro -F hsfs" this device on /mnt directory at DomU:-


Setup Sun Xvnc at DomU as advised by OpenSolaris instructions:


svccfg -s application/x11/x11-server \
add display1
svccfg -s application/x11/x11-server:display1 \
addpg options application
svccfg -s application/x11/x11-server:display1 \
addpropvalue options/server astring: "/usr/X11/bin/Xvnc"
svccfg -s application/x11/x11-server:display1 \
addpropvalue options/server_args astring: '"SecurityTypes=None"'

# Configure dtlogin to start it

mkdir -p /etc/dt/config
cp /usr/dt/config/Xservers /etc/dt/config/Xservers
echo " :1 Local local_uid@none root /usr/X11/bin/Xserver :1" \
>> /etc/dt/config/Xservers
pkill -HUP dtlogin

useradd -m -d /export/home/user1 -s /bin/bash user1
chown -R user1:other /export/home/user1
passwd -r files user1

Connect from another terminal session with:
vncviewer IP-ADDREES-DomU:1
and verify you see the login screen and can
login to a desktop session as user1.


Open connection to DomU via vncviewer to run:-
$ su root
# /mnt/DeveloperToools/install_devtools.sh


Make sure Sun Studio has been installed:-


Sunday, June 29, 2008


Fluent virt-install Windows XP HVM DomU at Solaris (SNV_92) Dom0


Due to known bug virt-install is not approved method for mentioned installation. However, simple bash script (monitor) provides an option to attach cdrom via xm block-attach command immediately when it will be lost by virt-install after first DomU reboot.
Start virt-install for Windows HVM DomU in first terminal session:-


virt-install -n WinXP --hvm -r 1024 --vnc \
-f /export/home/images/winxp.img -s 5 \
-c /export/home/isos/winxp.iso


At the same time start running following script in second terminal session:-


#!/bin/bash
COUNTER=1
while [ $COUNTER -eq 1 ]; do
COUNTER=`xm list -l WinXP|grep cdrom|wc -l`
sleep 1
done
xm block-attach WinXP file:/export/home/isos/winxp.iso hdc:cdrom r
xm reboot WinXP


When scripts exists wait for several seconds.
and issue from same terminal:-


vncviewer localhost:0


to proceed with install as normal.
Message in first terminal session.


Guest installation complete... restarting guest.
libvir: Xen Daemon error : failed Xen syscall xenDaemonDomainDumpXMLByID failed to find this domain -13551186
exception was: virDomainGetXMLDesc() failed failed Xen syscall xenDaemonDomainDumpXMLByID failed to find this domain -13551186
Domain installation may not have been
successful. If it was, you can restart your domain
by running 'virsh start WinXP'; otherwise, please
restart your installation.


may be ignored.

Wednesday, June 25, 2008


Virt-install F9 DomU at Xen 3.2.1 F8 Dom0 (64-bit)


Install may be performed either by virt-install or by virt-manager.
View [1] for details. However, after F9 DomU run other DomUs may be managed
only from command line by "xm". Virt-manager cannot connect to daemon
xend until next Dom0 reboot. Running F8, CentOS 5.1, SNV90 DomUs doesn't
affect virt-manager functionality. I also have to notice that F9 DomU
may be managed only by "xm" from command line. Been started and shutdown
once via virt-manager it makes virt-manager unable to reconnect to xend.
To start already created F9 DomU:-
# xm start f9pvm
and from another terminal session
connect to F9 DomU:-
# vncviewer localhost:0


References.
1.Fedora 8 (64-bit) as a flexible target for Xen 3.2.1 Dom0 install

Thursday, June 19, 2008


Install SNV91 DomU at SNV91 Dom0 on boards with integrated NIC RTL8110SC


ASUS boards P5K Premium/WIFI, P5K3 Deluxe, P5E3 Deluxe have as second
NIC integrated on the board RTL8110SC.
RTL8110SC (vs Marvell 88E8056 first NIC integrated on the board) is GLDv3 NIC and may be used for Solaris xVM PV and HVM DomUs creation at Solaris (Nevada) Dom0.
However, straight forward attempt to install SNV DomU in DHCP mode
will time out at DHCP request phase due to failure checksum offloading on Realtek 8110SC.
Core idea of network troubleshooting and modification of /etc/system
in SNV DomU were suggested by Jurgen Keil in the thread at xen-discuss
forum@opensolaris.org. Utility "tcpdump -s 1600 -vv" running on another host of the LAN (where SNV Dom0 is located) during SNV DomU DHCP request will register bad UDP checksums:-


08:38:01.361741 arp who-has 192.168.1.1 tell 192.168.1.39
08:38:02.220179 IP (tos 0x0, ttl 255, id 19410, offset 0, flags [DF], proto: UDP (17), length: 328) 0.0.0.0.bootpc > 255.255.255.255.bootps: [bad udp cksum 19ae!] BOOTP/DHCP, Request from 00:16:3e:29:b2:18 (oui Unknown), length: 300, xid:0x872bd9e3, secs:124, flags: [none] (0x0000)
Client Ethernet Address: 00:16:3e:29:b2:18 (oui Unknown)
Vendor-rfc1048:
DHCP:DISCOVER
MSZ:1472
LT:4294967295
VC:"SUNW.i86xpv"
PR:SM+DG+NS+HN+DN+BR+VO
08:38:18.970232 arp who-has 192.168.1.40 (Broadcast) tell 192.168.1.40
08:39:05.790989 IP (tos 0x0, ttl 255, id 19411, offset 0, flags [DF], proto: UDP (17), length: 328) 0.0.0.0.bootpc > 255.255.255.255.bootps: [bad udp cksum daad!] BOOTP/DHCP, Request from 00:16:3e:29:b2:18 (oui Unknown), length: 300, xid:0x872bd9e3, secs:187, flags: [none] (0x0000)
Client Ethernet Address: 00:16:3e:29:b2:18 (oui Unknown)
Vendor-rfc1048:
DHCP:DISCOVER
MSZ:1472
LT:4294967295
VC:"SUNW.i86xpv"
PR:SM+DG+NS+HN+DN+BR+VO


Due to DHCP request is a broadcast request same thing happens
on DSL Modem, acting as a DHCP bridge for the LAN.
DSL Modem just discards every DHCP request sent by xnf0 (DomU)
via rge0 interface (Dom0). Switching rge0 to rtls0 fixes
problem immediately. Box has a third NIC RTL8139 plugged into
PCI slot.
Procedure following bellow is a workaround for mentioned issue for Solaris rge0 Ethernet interface.
1. Install DomU with static IP address
2. After reboot modify /etc/system and add the line :
set xnf:xnf_cksum_offload = 0
3. Run sys-unconfig


This program will unconfigure your system. It will cause it
to revert to a "blank" system - it will not have a name or know
about other systems or networks.
This program will also halt the system.
Do you want to continue (y/n) ? y
Then the system will shutdown and when you reboot,
it asks all new server questions out of the box:
What your server name is ?
Are you on the network ?
Ask for DHCP or IP ?
What is your netmask ?
Do you have a defaultrouter ?
Root passwd?
Finally it run the kdmconfig and tries to configure
your X-display adapter and monitor size,mouse ps/2 USB or serial


4. During boot up specify request IP address via DHCP
and this time DHCP request won't be timed out.
Created SNV DomU may communicate with internet
with no problems.


Saturday, June 07, 2008


Virt-manager at Xen 3.2.1 F8 Dom0 (64-bit)


Procedure described in [1] installs packages mercurial, dev86, python-virtinst, virt-viewer. Virt-install as well virt-manager
appear to be completely functional on Xen 3.2.1 F8 Dom0 and
allow to create PV and HVM guests like on enterprise class systems.


Install PV DomU at Xen 3.2.1 F8 Dom0 (64-bit):-


Install HVM DomU at Xen 3.2.1 F8 Dom0 (64-bit):-


References
1.http://lxer.com/module/newswire/view/103746/index.html