Tuesday, September 04, 2007
Monday, September 03, 2007
Xen 3.1 Solaris Express 05/07 (SXDE 64a) HVM VM install on Debian Etch (x86_64)
The target of this posting is to make mentioned installation easy for any person regardless his Solaris Administration experience.Create Solaris HVM VM profile - /etc/xen/vm/Solaris.hvm :-
name = "SNV64A"
builder = "hvm"
memory = "1024"
disk = ['phy:/dev/sdb7,ioemu:hda,w','file:/etc/xen/disks/solar11.iso,hdc:cdrom,r']
vif = [ 'type=ioemu, mac=00:16:3e:1b:3d:f5, bridge=xenbr3', ]
device_model = "/usr/lib64/xen/bin/qemu-dm"
kernel = "/usr/lib/xen/boot/hvmloader"
vnc=1
vncunused=1
apic=1
acpi=1
pae=1
boot="d"
vcpus=1
serial = "pty" # enable serial console
on_reboot = 'restart'
on_crash = 'restart'
Create Solaris HVM VM:-
# xm create Solaris11.hvm
# xvnc4viewer localhost:5901
Next:-
According to http://bugs.opensolaris.org/bugdatabase/view_bug.do?bug_id=6534878
Bug ID 6534878
To install Solaris (SNV build 64a) HVM VM on Debian Etch
Solaris's boot command line should be modified.
Generally view :-
http://developers.sun.com/solaris/articles/getting_started_guide.html
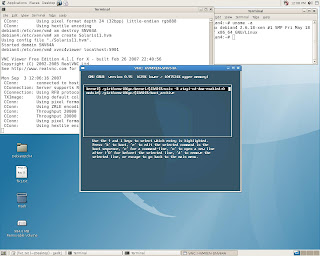
In particular when GRUB menu of HVM VM is displayed.
GNU GRUB version 0.95 (631K lower / 2095488K upper memory)
+----------------------------------------------------------------
|Solaris Express, Developer Edition
|Solaris Express
|Solaris Express Serial Console ttya
|Solaris Express Serial Console ttyb (for lx50, v60x and v65)
+----------------------------------------------------------------
Use the ^ and v keys to select which entry is highlighted. Press
enter to boot the selected OS, 'e' to edit the commands before
booting, or 'c' for a command-line.
To stop the booting process and use the menu editor, type "e"
The GRUB edit menu is displayed.
kernel /boot/multiboot kernel/unix -B install_media=cdrom
module /boot/x86.miniroot
Use the arrow keys to select the boot entry.
kernel /boot/multiboot kernel/unix -B install_media=cdrom
To edit the selected command, type "e".
A command that is similar to the following example is displayed.
kernel /boot/multiboot kernel/unix -B install_media=cdrom
At the end of the command, type ",atapi-cd-dma-enabled=0, atapi-other-dma-enabled=0" as in this example.
grub edit>kernel /boot/multiboot kernel/unix \
-B install_media=cdrom, atapi-cd-dma-enabled=0,atapi-other-dma-enabled=0
To accept the edits, press Enter.
Your changes are saved and the GRUB main menu is displayed.

To begin the installation, type b.
After the installation is complete, update the GRUB menu to prevent having
to edit the boot command each time you reboot.
To change the GRUB menu, locate the menu.lst file and add the ,atapi-cd-dma-enabled=0 text to the menu.lst file.
The following is an example of a menu.lst file entry for the Solaris OS that has been updated with the text.
title Solaris
root (hd0,0,a)
kernel /platform/i86pc/multiboot -B install_media=cdrom,atapi-cd-dma-enabled=0
module /platform/i86pc/boot_archive
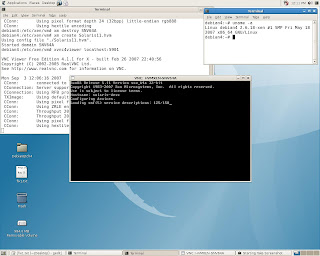
1. Installation screenshots for Debian Etch (x86_64) :-
During first boot Solaris's boot command should be modified again.
boot="d" switched to boot="c" in VM's profile.
Make permanent changes to /boot/grub/menu.lst
to avoid trouble during every Solaris HVM VM boot:-
Network Bridge verification:-
2. Installation screenshots for CentOS 5.0 (x86_64)
References
1. Lxer - Xen 3.1 Binary install on Debian Etch 4.0 (x86_64)
Monday, August 27, 2007
Xen 3.1 Binary install on Debian Etch 4.0 (x86_64)
This posting is supposed to respond the notice:-
A note on x86_64 systems: I tried to install Xen 3.1.0 on Debian Etch AMD64 as well,
but regardless of the method (Xen source install vs. Xen x86_64 binary install),
the Xen kernel didn't boot (no error messages, but the boot process was incredibly slow and never finished...)
from The Perfect Xen 3.1.0 Setup For Debian Etch (i386)
Debian Etch 4.0 (amd64) has been installed on box assembled with:-
Core 2 Duo E6600,ASUS P5B Deluxe, 2 GB RAM (Kingston non ECC),
SATA HDD Seagate Barracuda 160 GB x 2
Root login has been enabled :-
# apt-get install bridge-utils
# tar xvzf xen-3.1.0-install-x86_64.tgz
# cd dist/
# ./install.sh
Configuring xend:-
# update-rc.d xend defaults 20 21
# update-rc.d xendomains defaults 21 20
# depmod 2.6.18-xen
# apt-get install yaird
Create ramdisk:-
# mkinitrd.yaird -o /boot/initrd.img-2.6.18-xen 2.6.18-xen
Modify /boot/grub/menu.lst correspondently (add entry for xen kernel ) :-
title Xen-3.1 on Debian Etch x86_64 (2.6.18-xen)
root (hd1,3)
kernel /boot/xen-3.1.gz
module /boot/vmlinuz-2.6.18-xen ro root=/dev/sdb4
module /boot/initrd.img-2.6.18-xen
Reload into xen kernel.
apt-get install xen-tools
HVM CentOS 5.0 (x86_64) VM has been successfully built up.
Disabling system generating DHCP mode for VM's ethernet interface:-
Assign static IP address to eth0:-
Network bridge verification:-
HVM Windows XP VM has been successfully built up as well
Saturday, August 11, 2007
Xen 3.1 Windows XP VM install on CentOS 5.0
Perform HVM Windows XP VM install utilizing ISO image of distribution CD
already copied by "dd" to SATA hard drive.
Set boot="d" in VM's profile (windows.hvm) and proceed:-
# /usr/sbin/xm create windows.hvm
# vncviewer localhost::5901
Another option to build HVM VM utilizing block oriented device:-
Now set boot="c" and proceed:-
# /usr/sbin/xm create windows.hvm
# vncviewer localhost::5901
# /usr/sbin/xm create windows.hvm
# vncviewer localhost::5901
Partitions /dev/sda8 and /dev/sda9 have been used to store Windows XP VMs:-
Friday, August 10, 2007
Xen 3.1 Binary installation on CentOS 5.0 & ASUS P5B Deluxe
Perform Xen 3.1 binary download from following location :-
Try "http://xen.xensource.com/download/dl_31tarballs.html" if mentioned URL doesn't work.
Attempt to use compiled binaries might fail sooner or later due to hardware issues.
Fortunately, 2.6.18-xen kernel does understand the hardware assembled
on ASUS P5B Deluxe and Marvell Yukon Gigabit Ethernet in particular. Actually, it means that any board based on (I965+ICH8R) or (I975+ICH7R) would be in general OK for Xen 3.1 Binary installation , but might have trouble with Ethernet Adapter. The first example is Atansic Gigabit Eternet on ASUS P5B-E. This board would require xen kernel source to compile Atansic Ethernet Driver.
Install bridge-utils-XXXX-x86_64.rpm if needed.
cd /tmp
tar –xzvf xen-3.1.0-install-x86_64.tgz
The tar command will create a directory named "dist"
# cd dist
Place all of the Xen files into their places in the file system by running
# sh ./install.sh
Determine the name of the Xen Linux kernel version that was installed.
# ls /lib/modules
There should be a directory for the Xen Linux kernel (e.g., 2.6.18-xen)
Generate the module dependency list and map files
# /sbin/depmod 2.6.18-xen
Create the Xen initial ramdisk image
# /sbin/mkinitrd /boot/initrd-2.6.18-xen.img 2.6.18-xen
Disable tls
# mv /lib64/tls /lib64/tls.disabled
Set xend service to start
# /sbin/chkconfig --add xend
# /sbin/chkconfig xend on
Edit /boot/grub/grub.conf and copy one of the existing boot entries to make the required changes for Xen.
title Xen-3.1 x86_64 (2.6.16-xen)
root (hd0,2)
kernel /xen-3.1gz
module /vmlinuz-2.6.18-xen ro root=/dev/VolGroup00/LogVol01 rhgb quiet
module /initrd-2.6.18-xen.img
Reboot into new kernel and start network bridge.
# /etc/xen/scripts/network-bridge start netdev=eth0
System and Windows 2000 VM configuration:-
Perform HVM Windows 2000 VM install utilizing ISO image of distribution CD
already copied by "dd" to SATA hard drive.
Set boot="d" in VM's profile (w2k0.hvm) and proceed:-
# /usr/sbin/xm create w2k0.hvm
# vncviewer localhost::5900
Now set boot="c" in VM's profile (w2k0.hvm) :-
# /usr/sbin/xm create w2k0.hvm
# vncviewer localhost::5900
# /usr/sbin/xm create w2k0.hvm
# vncviewer localhost::5900
Windows XP VM installation procedure is quite similar
Network Bridge verification for Windows XP VM:-
Wednesday, August 08, 2007
Xen 3.1 Network Configuration on SLES 10 SP1
This posting is targeting to accomplish work started in [1]
Modify VMs profiles in /etc/xen/vm directory as follows:-

This is not important when you have just one Ethernet interface on the box.
Suppose you have two and created two bridges:-
# /etc/xen/scripts/network-bridge start bridge=xenbr0 netdev=eth0
# /etc/xen/scripts/network-bridge start bridge=xenbr1 netdev=eth1
For example the line:-
vif = [ 'bridge=xenbr0, mac=00:00:00:11:11:11' , 'bridge-xenbr1, mac=00:00:00:22:22:22' ]
would pass two NICs to the VM with different MAC addresses, eth0 pointing to xenbr0
and eth1 pointing to xenbr1, either you can choose which one of NICs to pass to particular VM.
Start network bridge with default name, start VMs windowsxp and windowsxp1 and disable Control Panel->Firewall
for both of them , then issue "brctl show":-
Start Network Wizard in each one of VMs and activate Windows Network GUI.
Verification of TCP/IP connectivity:-
Verification of TCP/IP connectivity from remote PC:-
VNC Connection to SLES 10 SP1 box running Xen 3.1 HVM VM
Adding line containing IP-address of SLES box on local network :-
vnclisten="192.168.0.56"
to VM's profile /etc/xen/vm/windowsxp
allows vncviewer to run Windows XP session on remote Linux and Windows boxes:-
References
1.Xen 3.1 HVM on SLES 10 SP1
http://lxer.com/module/newswire/view/90738/index.html
Subscribe to:
Posts (Atom)